Anifun Photo to Anime: From Casual Selfie to Professional Anime Portrait
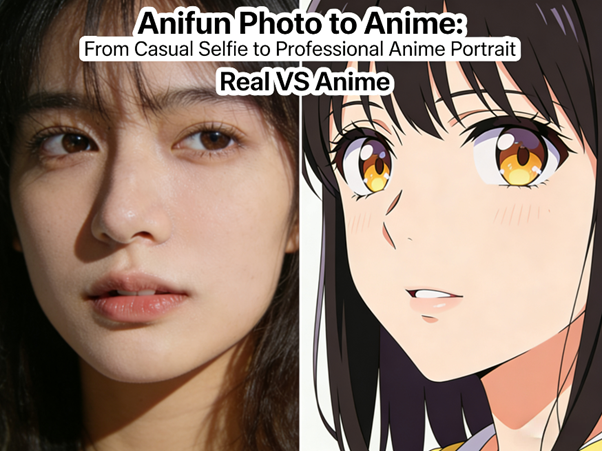
Turning a casual selfie into a polished anime portrait is easier than it sounds—but only if you understand the process and know which steps matter most. By experimenting with photo to anime tools, I discovered how small adjustments can drastically improve the realism, style, and visual appeal of your final character.
Step 1: Preparing Your Photo for Best Results
Choosing the Right Selfie
Select a clear, well-lit image with a neutral expression. Avoid heavy shadows, filters, or extreme angles.
Adjusting Backgrounds
A simple, uncluttered background helps the AI focus on facial features instead of distracting elements.
Enhancing Facial Features
Slightly brighten the eyes and smooth skin tones to provide a clean canvas for the transformation.
Checking Resolution
High-resolution photos produce sharper anime portraits; low-res images risk pixelation or distortion.
Consistency Across Multiple Photos
If creating multiple avatars, maintain a similar pose and lighting to ensure style uniformity.
Step 2: Transforming Photos with Anifun Photo to Anime
anifun photo to anime playground
Uploading and Selecting Style
Anifun allows users to choose from multiple anime aesthetics. Decide whether you want a classic, chibi, or modern anime style.
Fine-Tuning Facial Expressions
Subtle adjustments to eye shape, mouth curve, and eyebrow position create a more expressive and believable character.
Adjusting Color and Lighting
Ensure skin tones, hair color, and shadows remain natural to avoid the “flat” look often seen in low-quality filters.
Preview and Iteration
Use Anifun’s preview function to compare outputs, making incremental tweaks until the portrait feels balanced.
Maintaining Facial Integrity
High-quality AI preserves proportions, so the character still resembles the original person while embracing anime styling.
Exporting High-Quality Files
Save in a format suitable for thumbnails, profile icons, or larger illustrations without losing clarity.
Step 3: Polishing the Portrait for Professional Use
Background Enhancement
Consider adding subtle gradients or soft patterns to make the character pop in digital layouts.
Adding Small Details
Shine in the eyes, highlights in hair, or slight blush can elevate a casual portrait to professional-looking artwork.
Ensuring Brand Consistency
If creating multiple avatars for a channel or portfolio, keep styles, colors, and proportions consistent.
Integration Into Content
Test the portrait in thumbnails, banners, and social media profiles to ensure it retains appeal at various sizes.
Feedback and Adjustments
Ask peers or fans for feedback on recognizability and aesthetic appeal. Use this input to refine the portrait.
Saving Versions for Future Use
Organize multiple iterations so you can quickly swap or update avatars without starting from scratch.
Conclusion: Photo to Anime Transformations Can Elevate Any Casual Selfie
A well-executed photo to anime portrait workflow turns ordinary selfies into professional anime characters, ready for digital content or branding. With Anifun photo to anime, creators gain both quality and consistency, ensuring each transformation highlights facial features while embracing stylistic flair. Small preparation steps, careful adjustments, and post-processing elevate the final result from casual to professional.